Monday, February 23, 2026

1967 Ampeg B-15NF

As received. It actually looked better than the Reverb pictures.

I’ve really enjoyed building amps, but it’s time for me to take on something a little more challenging. I found a 1967 Ampeg B-15NF head on Reverb listed as “Non Functioning.” It looks like it it’s either been in a salt water environment or someplace damp as there’s surface rust and other signs of neglect, but it appears to be mostly complete. The price was low enough that I can buy a lot of parts and still make it worthwhile. I expect it’s going to be very labor intensive which would likely put it out of the realm of having a tech restore it, but since I enjoy that kind of work it should be doable. I suspect it has never been worked on since the can cap shows a 1967 date code. It may not have been opened up - We’ll see once it gets here.

 1/23/26 - Received the amp and did a quick initial inspection. Power and speaker cords cut for safety. Non standard screws to chassis tray. Missing one tube cage nut. Externally dirty but corrosion is not as bad as I expected. Unblown 3A fuse installed. Pulled chassis. Inside is clean and looks to be 100% original! Power cord was 2 conductor, all caps have a 1967 date code. 

Internally it looked original and in good shape!

 1/25/26 - Performed initial chassis cleaning with WD-40, cleaned tube sockets with alcohol. Checking component values, 5.6M and 2.2M grid leaks are out of spec high. Removed chassis tray from top panel, removed shock mounts and shield plate. Planning on recovering chassis tray. Need to order tray material, tube cage gasket and ‘60’s style knobs. 

 1/27/26 - Checked values and transformers. Cleaned chassis with aluminum foil for rust and applied glass wax. Replaced 100/100 bias cap, switch, pot and jack hardware. 1/31/26 - Installed grounded power cable. Replaced coupling caps. Ordered new knobs, tube cage gasket and tolex for chassis tray.

 2/2/26 - Received parts order. Installed new electrolytic, speaker cable and cage hardware. Speaker cable had open to pin 1. (Whew - started pricing output transformers!) Surprisingly enough the old tubes work, although the 6L6s are seriously mismatched with one at 46ma and the other at 25ma. Ordered a matched pair of TAD 6L6WGC/STR.

Internal work completed.

 2/9/26 - Found a 1973 Eminence 15" square magnet on eBay. I figured I could recone it as necessary, but it actually seems to work pretty nicely.

 2/14/26 - Received parts order. Installed new tube cage gasket and knobs. (Nothing wrong with the old knobs other than being the 1967 type that apparently nobody liked.) Recovered tray and re-glued shield/schematic panel. 

 2/19/26 - Ordered a single baffle cabinet from Fliptops.

 This project turned out not to be as challenging as I originally thought. I think this amp lived in a garage or shed for quite a while. I'm guessing the cabinet got trashed somewhere along the way. The XLR speaker connector had been cut off and sloppily wired so the external speaker jack would work. The "death cap" was out of spec so I'm guessing someone got shocked and cut the plug off the power cable. All the amp needed was a recap, new power and speaker cables and a set of 6L6's. I've probably spent more time on cosmetics - cleaning up rust, new logo plate, new Tolex for the amp tray, etc. One thing I haven't quite figured out is how Ampeg rated these amps. The spec in the 1966-67 service manual claims an output of 25 watts, though most sources say 30 watts. With a 200mv 1kHz signal in I'm getting 39 watts clean. Even on a Variac dialed in for 6.3v heaters (115v line) I'm still seeing 36 watts RMS out. These are original transformers and in tolerance components so Ampeg must have really been under rating its amps.


Temporarily installed on old cabinet top.

After going through this amp I have to wonder about its’ history. The cabinet top had been cut and the speaker connector was cut and jury rigged in such a way that the external speaker jack would work as a 16 ohm connection instead of in series with the cabinet speaker. Did the cabinet get destroyed somehow? All this amp needed was a new power cord, speaker cable, capacitors and a sete of 6L6s. Total parts cost - $235. Add $150 for 2 hours labor and for under $400 you have an excellent little amp head. Add another $150 for parts and 3 hours or so of labor if you want cosmetic work done. That might be more than a person might want to spend going to a good tech, but it’s a no brainer for someone doing their own work. I’ll update this post when I get the speaker cab.

Resources used: Fliptops for all things Ampeg specific, Amplified Parts for various components, and EL34world.com for schematics and the 66-67 B-15NF service manual.

Saturday, October 19, 2024

Mojotone 6G15 Reverb Unit

Mojotone 6G15 cabinet


A while back I was looking for a project that wasn’t going to take up a lot of room and decided on the Mojotone 6G15 Reverb kit. While mostly a straight forward kit I did run into a couple of “gotcha’s” along the way. The kit is almost an exact replica of the original Fender product. I elected to use original value components so I went with 40mF filter caps and a NOS 6K6GT in place of the 20mF and 6V6GT supplied. To be honest I played with both configurations and I can’t tell the difference but being a grumpy old coot I stayed with the original schematic with the exception on the grounded power cord.  More on that in a bit. 


Completed, but prior to changing over to a two wire polarized power cord


Assembly was straight forward except as drilled the power transformer frame was nearly touching the hot terminal of the power switch. Looking at pictures of the original units I saw the transformer was really stuffed in the far corner so I drilled new mounting holes for it. Unlike most installations the power transformer is mounted on the inside of the chassis so there is no large cut out to deal with. I also used an original style low profile Carling SPST instead of the larger DPDT supplied with the kit. That left plenty of room. Otherwise it was Mojotones usual easy assembly. I wish they had supplied a blackface front panel with it, but the tweed style chrome looks fine and I suspect they don’t sell enough of these to justify the expense. 


The chrome panel works, but I would have preferred a black face panel


The only functional problem is that with a 3 wire power cord you have a serious ground loop. The original Fender used a 2 wire power cord and unlike every other Fender amp till the ‘70’s had no “death cap” circuit avoiding ground loop issues. If you put a 3 wire plug on them you get the same problem. The Fender reissues are circuit board built and are designed with separate signal and chassis grounds. After playing with the options I elected to go with a polarized two wire power cord since a chassis ground is established through the instrument cable to the amp, but there may be code issues preventing Mojotone from doing that. Other options are using an isolated box on the cable between the reverb and the amp, using a ground lift plug, or using an isolation transformer on the power cord. All that being said, the 6G15 Reverb sounds awesome and I have no regrets.


Friday, January 20, 2023

Building a Classic Amp Design


The completed project.


<tap…tap…> <Is this thing on?… testing 1,2...>


It’s been a long time since I’ve posted anything, indeed, I thought any future posts would go to my photo blog which has also been sitting idle. Since this is not a photo post, I figured this was as good a place as any... Guess I haven’t had much to say. Retired life is excellent!


Way back in the day I started out as an Avionics Technician in the Navy. I grew up reading Popular Electronics and occasionally building one of their projects, so it was a natural thing.  While I moved on into the computer world eventually, I still have that fascination with things electrical. Also being a musician of sorts, it was only natural I fell into this project.


The Fender 5F6A Bassman amplifier made from 1958 to 1960 had quite the influence on popular music - both country and rock. While intended as an amp for bass guitar, its biggest influence has been as a straight guitar amp. An original ’59 Bassman goes in the neighborhood of $10,000 or so, putting it out of range of the average guitarist. This was the amplifier circuit that Jim Marshall based (with modifications) his original Marshall JTM 45 on.


Fender sells reissues which while using the same circuit design are built using modern techniques on printed circuit boards. While no doubt a fine amplifier, dinosaurs like myself long for the old school hand wired amps. Fortunately, there are several companies that have assembled kits to the old specifications. One of these companies is Mojotone, and I recently bought a 5F6A kit from them. I thought I’d share the construction process.


The short version - I built one of my dream guitar amplifiers. It was fun. It sounds great! If you want all of the gory technical details, continue reading. 


Caution: Techno-babble may appear at any time in this post. :-)

I went with Mojotone because they assemble a quality kit based on the original Fender schematic and layout documents. There are a few modifications - the old two wire power with a ground switch is replaced with a modern 3 wire power cord and updated switches, and the grounding capacitor in the original circuit is deleted since it is potentially dangerous and doesn’t do anything with the modern power cord.


The speakers installed. The wiring will get shortened after testing.

Mojotone sells the kit as a chassis only, you have to order the cabinet and speakers separately. As the cabinet can be custom made and covered to your specification this makes perfect sense. I ordered the kit and cabinet from them in the first week of December. I received the cabinet in a couple days, but the kit was back ordered. This was clear on their web site, not a surprise. I ordered four Jensen P10R speakers locally from Antique Electronics Supply. I went with the P10Rs partly because that was the original speaker used in the Fender amps, but mostly because I really like the sound of them. I went ahead and installed and wired the speakers in the cabinet as that was the most convenient way to store them until the kit arrived. 


The kit is well packaged and complete.


Mojotone said back orders for kits were 4 to 6 weeks, and promptly four weeks later it was delivered. While the kit has everything you need to build out to the schematic, I wanted to make a couple of changes. As anyone who has worked in electronics can tell you, the published schematic is a starting point and not always what was shipped. Fender changed a couple of things along the way and I wanted my amp to reflect that. For those interested the changes I did were to use linear potentiometers for the volume controls instead of audio taper, changed the tone slope resistor from 56kΩ to 100kΩ, the bass capacitor from .02 to .1 ufd and the phase inverter tail resistor from 10kΩ to 6.8kΩ. In addition, instead of using a 5kΩ pot for the presence control, Fender used a 25kΩ linear pot bypassed with a 4.7kΩ resistor. Because of the magic of electronics, this meant that the AC signal saw a 3.9kΩ log taper pot (through a capacitor) to ground while DC saw 4.7kΩ. Finally, I wanted to add a Master Volume control and ground the circuit directly to the chassis or brass ground plate like Fender did back in the day. Mojotone provides ground tabs to be connected to the transformer mounting bolts since chassis grounding requires a heavy duty soldering iron that most people don’t need in addition to one suitable for electronics. I also bought a matched set of 5881 tubes to use instead of the more popular 6L6CG tubes provided by Mojotone.


Basic chassis wiring
Transformers and filter caps


After verifying the kit was complete, I started by getting the chassis as complete as possible. This meant installing the transformers and choke, tube sockets, and some of the front panel. I also prepared the grounding points by removing the plating with a Dremel tool and tinning the spots with solder to make it easier once I was ready to attach the grounds. I went ahead and assembled the filter capacitor board and installed the filter caps in the pan on the outside of the chassis. Fender grounded the filter caps directly to the pan in the ’50’s, while Mojotone runs the ground to the board with the signal grounds. I went ahead and ran the ground to the chassis point with the AC grounds to keep them separated from the signal path. I also cleaned and prepped the grounding points on the brass plate I added under the controls and tinned those points as well. Finally I installed those components that mounted to the tube sockets and ran the power and output transformer wires where possible. I ran the heater power to the pilot light socket, but didn’t run the heater wiring since it would get in the way. By the end of day one most of the chassis was complete.


The guts.

On day two I set the chassis aside and populated the eyelet board with components. This is a pretty straight forward process made a little more challenging by the resistor leads being just barely long enough - the made them longer in the ’50’s. Then I flipped the board over and ran the wires required underneath the board and soldering everything in place. I took the time to read the wiring with an ohmmeter to make sure it was correct. It’s pretty tedious to have to take the board out once it’s wired into the chassis. Finally I attached the wires for the tube sockets and front panel controls. At this point I took a long break, coming back later to verify everything. 


The completed chassis.

Once I was happy with the board I went ahead and installed the controls in the chassis and proceeded to install the board. Finally I ran the heater wiring to all the tube sockets and installed the power cable. As tempting as it was to power up at this point, I knew better and figured the next morning I would check everything while I was fresh before starting to test.


The testing begins...

All rested up, I inspected the assembled amp again for obvious problems, and with the ohmmeter made sure ground was connected to ground and power was connected correctly. With no tubes installed I powered it up and checked the filament voltages and the bias supply voltage both of which were unsurprisingly high. This amp was designed when wall voltage was generally around 110, so everything is a little hot, though still within tolerable limits. (I later put the amp on a variable transformer and set it for the filament voltage of 6.3 volts. The input voltage was 111.5v. Normal wall voltage around here is about 121.5 and I've seen it as high as 123.6.) Next I installed the rectifier tube and checked the DC voltage at the Standby switch. This looked good so it was time for the fun to begin...
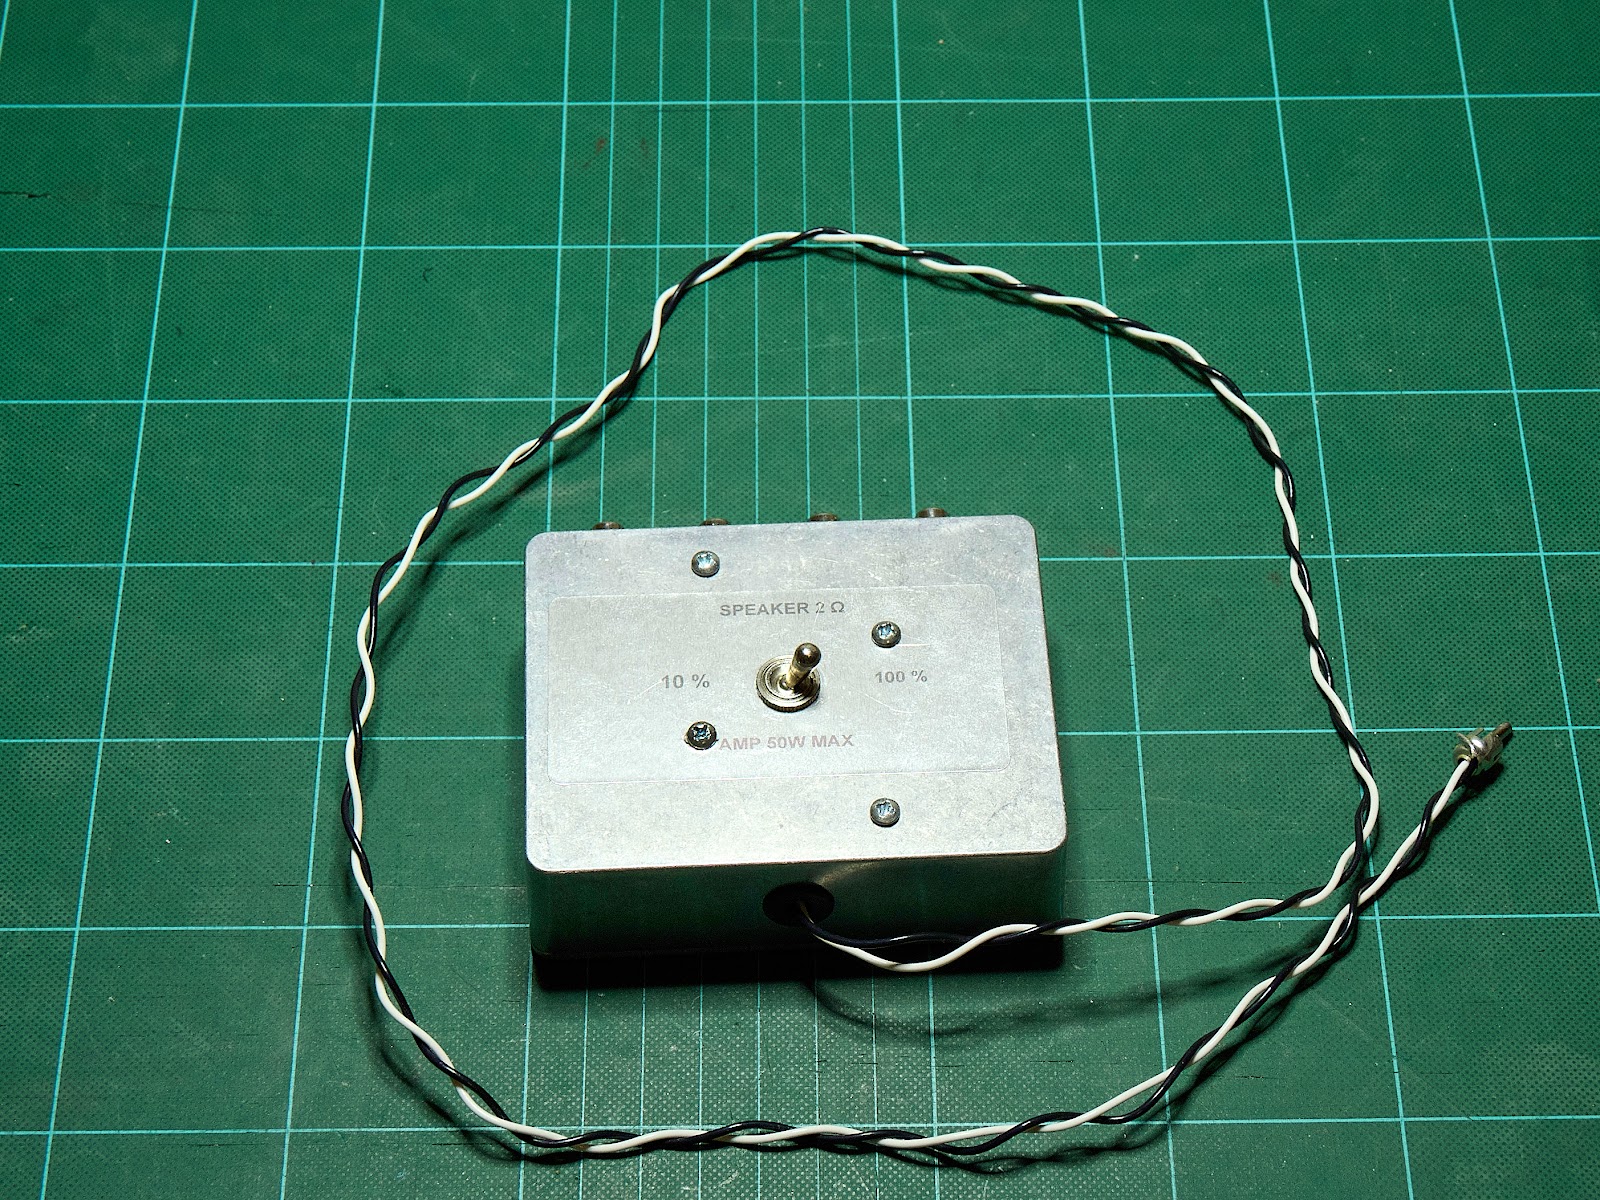


Reduces the power by 90%.
Makes it the volume of a 5 watt Champ.


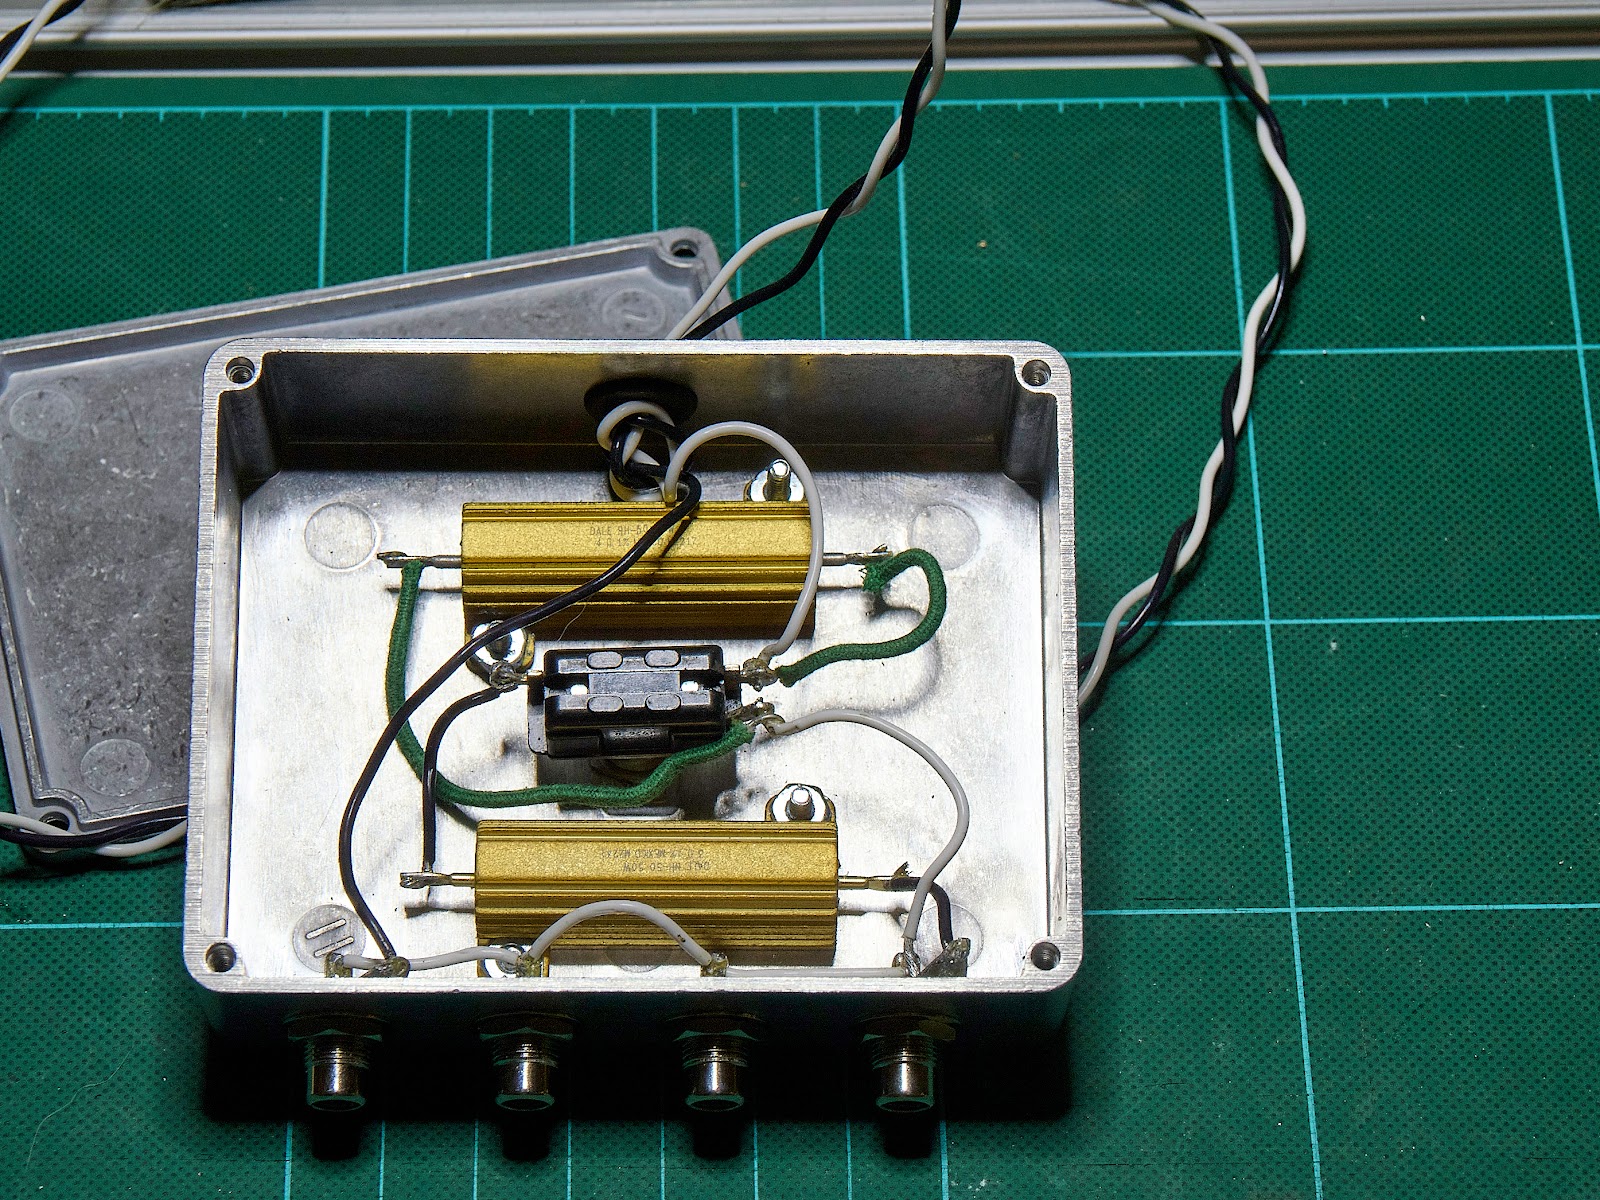
This amp design has negative feedback from the output back to the power section. If the output of the tubes are reversed the negative feedback becomes positive as indicated by a loud unpleasant squeal that ignores the volume control. I made a box to go between the amp and speakers that reduces the power by 90%. Because of the magic of physics this cuts the volume in half - still loud, but you can stay in the same room with it. Thanks to Rob Robinette's web site for this little design. Combined with the long speaker wiring it allowed me to have the cabinet under my bench while I tested the chassis.

So with my speakers hooked up through it I put the tubes in and powered it up. No squeal so I thought I was good for phase, but if the master was turned up and the presence turned down it made some weird noises. As it turned out the master volume I installed kept it below the feedback level. It took me a few minutes to figure out what was going on, but once I did a quick swap of the output transformer leads took care of that problem. Next I checked voltages throughout the amp and found a preamp tube with no plate voltage. Power down, drain the caps, and found a cold solder connection. After repairing that my voltages were good so I installed the chassis in the cabinet and checked the biasing of the output tubes. I want the bias to be between 50 and 60 percent of the maximum range for the tubes, but was barely at 25%. Way too cold! Using a resistor box I played with it and decided on the value resistor I needed. Of course I didn't have it so Antique Electronics Supply got it to me the next day. It wasn't even a rush order. The stock bias resistor was a 56kΩ, and after some experimentation I ended up using 30kΩ. With wall voltage at 123.3 this gave me a bias of 63% with 5881s and 66% with 6L6GCs. This is a little hotter than I prefer, but well within the safe range and wall voltage will normally be closer to 120v.

With bias sorted out I plugged in the guitar and it sounded pretty good, except none of the tone controls did anything. D'Oh! I forgot to ground the middle control pot which is the ground for the entire tone stack. With that taken care of everything seems to be working so I removed my power reducing box and shortened the speaker leads.

Mostly done, but I hadn't shortened the speaker wires, yet.

The only other surprise was that I intended to use a chicken head knob on the master volume to match the rest of the knobs, but I installed the master volume in the space for the no longer used ground switch. This spot was too close to the cabinet so I had to use a round knob. The master volume circuit I used was the Trainwreck type 2 which works really well. I made the power reduction box to keep the volume under control while still being able to overdrive the amp, but the master volume works so well the box is unnecessary. I'll keep it for full power testing, though.


Some resources I used for this project -


Vendors:


Mojotone - Supplier of amplifier and guitar parts, cabinets, speakers, kits... Very responsive and good support. There are other quality kit suppliers out there, but I've been happy with Mojotone. Free shipping for orders over $99, but shipping is a bit high on small parts orders.


Antique Electronics Supply - My local source for components. Also matched power tubes. While they are on the other side of town from me, it's actually quicker and cheaper for me to order online from them. Postage on small parts orders is less the the cost of gas for me to drive there.


Mouser Electronics - Excellent supplier of components. I think they have everything.


Stewmac - Primarily a luthier supply house, they also handle some electronics.


Web information:


Rob Robinette's Web Site - A gold mine of information on tube amplifiers.


Youtube:


Psionic Audio - Amplifier repair in Memphis done right. Lot's of good information.


Uncle Doug - Lots of neat amplifier restoration videos.


Millstap - This guy has an original '59 and '60 Fender Bassman, and posted detailed videos on how the amps were actually constructed as well as detailing some of the required maintenance on old amps.


Friday, March 01, 2019

Still out here... kinda

F-35s RTB to Luke AFB after a training mission. View from my back porch.
Well, it's been quite a while...

I started posting as Pogue back in 2004 when my National Guard unit deployed to Kuwait. The blog was mostly a way of letting friends and family know what was going on without having to write the same letter a bunch of times! In the interest of OPSEC I kept things relatively obscure.

Pogue lasted through the Kuwait deployment, transition from Field Artillery to Aviation and my deployments to Iraq and Panama. Just over a year ago I retired from the National Guard and had the intention of coming up with an awesome post about it. OK, so that didn't go a planned...

This blog and my Photo Pogue blog are pretty much done now, since the need for OPSEC is no longer an issue. I'll be leaving them up but they will be inactive.

If anyone is interested in my random thoughts and photographs I'm still out there at Phil Ryan Photography. Feel free to drop by!

Thursday, May 05, 2016

Bucket Work

Photo by Rick Klaur
Doing our annual re-qualification for Bambi Buckets.  Yeah, those are my feet hanging out the side of the helicopter.  Sitting in the door gives you the best visibility for the drop.

Tuesday, May 03, 2016

Sea Cobra

Marine Sea Cobra overflies the house
It's been pretty slow here what with most of the unit being off to Kosovo, and me working with the rear detachment.  Kind of quiet...  So when I heard that distinctive Huey "wop-wop-wop" I grabbed my camera and caught this guy probably headed to 29 Palms.

In non-military related news, the Missus and I just got back from a trip to Havasupai in the Grand Canyon.  Trip report here.

Monday, November 23, 2015

Just stopping by...

These look like so much fun
We recently had some of our Regular Army friends drop by on their way to some training.  That really looks like a fun way to arrive at a location - I wonder if the airlines are working on it?

Just in case they need to go through the bad part of town

Sunday, July 26, 2015

Annual Training

Waiting to extract some MPs

The last two weeks have been our annual training period, and unlike the last couple of years we actually got to do some training we needed instead of just fun stuff.  To clarify, we have new pilots and crew chiefs that have to progress through a series of specific tasks before they can become qualified.  While the Angel Thunder exercise last year and the Panama deployment the year prior were fun for those of us who were already qualified, and looked great on the battalion brag sheet, they didn't allow us to do the the progression training we really needed.

This year the number one mission was progression, and while we did have a couple of other commitments, they complemented rather that competed with our primary mission.  As one of the crew chief flight instructors I spent most of the time on night shift working with our trainees who had progressed to the NVG (night vision goggles) portion of the training.  The first couple of nights we supported some Air Force JTACs (Joint Tactical Air Controllers) in an exercise that involved us, combat search and rescue, a couple of Apache gunships, some F-16's and an AC-130.  We used this opportunity to take one of our crew chiefs who was nearly completed with training for an exposure to a difficult mission in as close to combat conditions as possible.  He did fine, and overall it was a good mission.

The MPs getting their safety briefing from a crew chief prior to loading

We also did a four ship night air assault to insert and extract some MPs in support of their training.  This is one of our standard missions, but not something they get to do very often.  We had to watch the weather since a storm was threatening the area, but it slid back down into Mexico so we didn't need to execute any of our contingency plans.  It was a dark night, and dust was a bit of an issue, but the training went well.


The above video was taken by SSG Marco Lechuga, a former member of out unit.  He's working with another command at the moment, but this is a small community so we expect him back eventually.  It's a neat slow motion video of sling operations from the point of view of the hook up team.  This night I was evaluating one of our trainees in NVG sling operations (he passed, btw).  It was a tough night - we had dust blowing in and 22 knot gusts from the south (left on the video.) It kept both him and the pilot working.  This is also a pretty good look at the world through NVGs.  The bright light on the right of the helicopter is the red position light.  It's actually no brighter than the green one on the other side, but the goggles are much more sensitive to red.

Sunday, July 05, 2015

The Rockets Red Glare...

A star burst from the town fireworks display
When the Missus announced yesterday that she had always wanted to photograph fireworks and that the town show was only a couple miles away, my first reaction was something of an internal groan.  I've never been very fond of being in large crowds, so I don't have much desire to go to local events.  And having spent years on the outgoing and occasionally incoming sides of large ordinance has somewhat diminished the amount of charm the annual fireworks show holds for me.  However she clearly wanted to go and since the first rule of getting a good photograph is to stand in front of something interesting that became the plan for the evening.

Fortunately for me, the Missus isn't all that partial to large crowds either, so when we went out to scout the location in the afternoon we found where the public venue was being set up, and more importantly we found out where the fireworks were going to be launched from.  It turns out there is a large empty field with an unobstructed view of the launch site about a mile away, really a perfect distance to photograph from.  We also scouted out an alternate about two miles away in case the field was going to be closed.

The show was scheduled to start at 9:00pm, so we arrived about a half hour early to set up and found that there were several families out in the same field, but there was plenty of room and the session went well.  We both got some nice shots and it was a pleasant evening.

Settings:  Camera was on a tripod, set to ISO 200, 75mm lens (150mm full frame equivalent), f/8, 4 second exposures.  

Thursday, May 21, 2015

Inspiration

Morris
We went on a photo trip to Monument Valley recently, during which we met Morris.  Morris was a Corpsman (medic) with the 22nd Marines for the the invasion of Guam and after they were moved into the 6th Marine Division the invasion of Okinawa, where he lost a leg.  He went on to be a successful businessman in the chemical industry and for his upcoming 90th birthday decided to treat himself to a rather strenuous 5 day photography workshop. He was fun company and we had some great discussions with him during the week.  I hope I'm half as sharp and active when I reach 90.  Hell, even reaching 90 is an accomplishment.

Sunday, May 03, 2015

Unexpected Visitor

A Schweitzer 300C prepares to leave after paying a visit to the facility.
Drill this weekend was livened up a bit by a visit from this S300 operated by a local flight school.  They were passing near the facility on a photo flight when the pilot noticed an unusual vibration and a reduction in engine performance.  This is not the sort of thing you want to be troubleshooting in flight and the pilot wisely decided to make a precautionary landing.  Nearby Sky Harbor tower pointed out our facility as the nearest safe place to put down, which he did.  The pilot and photographer were then introduced to Army paperwork and spent some time talking with Operations, Security and the Phoenix police while waiting for a company mechanic to come out and look at the problem.  (No, they weren't in trouble, it's just that the right process has to be followed.) As it turned out they had a fouled spark plug, a not unknown condition with that type of engine.  After fresh plugs were installed and the ship tested, they proceeded on their way back to their home airport.  While it was a bit of an administrative hassle for them, at least they didn't land at an Air Force base where security rolls out with loaded machine guns when an unexpected civilian aircraft shows up for whatever reason.  We enjoyed the visit, and this being the first time this had happened at the facility Operations developed a standard operating procedure to use should it happen again.  Good job on the pilot who made the correct decision for the situation.

Wednesday, March 11, 2015

A busier than usual drill weekend


We had a long drill this last weekend, partially because it was our aerial gunnery drill out at Gila Bend and partly because we're preparing for an upcoming admin inspection.  As a result we had a four and a half day drill this month.  This half day bit is arguably a waste of time since all it really does is ensure that everyone is tired at the start of the first full day of training, but the powers that be seem to love the illusion of progress.  On Thursday, however, we managed several training flights, inspection preparation and prepared all the equipment for Fridays trip to the range.  Unlike past gunnery quals this time we did not stay out at Gila Bend.  Since we're only a 30 minute flight from there it worked well for us, and hopefully we'll do it that way again next time.  Friday was scheduled for the crews that were fully qualified in day, night and NVG operations.  This made for a fairly busy afternoon and evening, but we still managed to get everything wrapped up by 10:00pm.  Saturday we came back out first thing in the morning to take care of the crew members that were not yet Night/NVG qualified and also ran some pilots and VIP's through the course on the guns.  Pilots don't get to shoot the machine guns very often, so it's nice for them to get the chance.  It also helps us as they get a better feel for the limitations involved.  While we had the range scheduled for well into the evening and Sunday during the day in case we had some problem, we ended finishing up before noon on Saturday.  Everyone gets excited about drawing 30,000 rounds of ammo, but with four helicopters that's actually only about 10 minutes at the cyclic rate of fire.

If you ain't shootin', yer loadin'...

While were were fueling at one point on Saturday the Maintenance Officer called with an interesting proposal:  Between us and the Med Det we have 12 helicopters assigned, and all of them were up.  He suggested we take the opportunity to do a 12 ship formation as a salute to the maintenance troops down to the Best Warrior competition at Florence Military Reservation on Sunday.  While the competition would be wrapped up by the time we got there (we're not allowed to fly before noon on Sunday), the brigade command staff would still be there.  Anyone who has ever been involved in military aviation knows how rare it is that they have 100% of the assigned airframes available - it just does't happen very often.  We had done 10 ships flying for deployments, but no one could recall a 12 ship.  We jumped on it.

I'm in the fifth one from the top, Chalk 5
Our senior instructor pilots started doing the mission planning, and by Sunday morning we were planned and approved and having our formation briefing.  Since we can only launch four at a time from our facility, the plan was to launch three flights of four and lager at the nearby airfield at Superior, a dirt strip that gets little use.  From there we would fly down to Florence.  By 12:30 we had as many maintenance and support company people loaded in the helicopters as we could carry and were preparing for a 1:00 launch.  Things were running smoothly until Chalk 11 reported a sheared starter shaft.  There was no way it was going to be able to launch with us.  Our remaining maintainers weren't going to take this lying down however, and requested approval to swap the starter and have Chalk 11 join up with us on the way to Florence.  The mission commander approved that immediately and we proceeded with the mission.

We reached Superior as scheduled, and were updated on the status of Chalk 11.  The starter replacement was completed and they were doing the operational check.  They predicted launch in about 10 minutes so it was decided we would delay at Superior for 5 minutes so they would join up with us in our practice area near Williams/Gateway airport (the old Williams AFB for you wing wipers out there...)

It all came together, we joined up without incident and completed the mission. Returning to base the tower at Sky Harbor could be heard chuckling as he granted permission for the flight of 12 through Phoenix airspace.  During our debrief one of the crew chief was informed by his parents who were at a MLB spring training game that they put us up on the jumbo-tron as we flew by, and sent us an phone picture of us passing by.

When all was said and done several of us were talking about it and couldn't decide what was more impressive - that we pulled off a 12 ship formation flight, or the fact that the whole mission was put together in less than 12 hours.


Friday, February 27, 2015

Crypto - a Sea Story


Back in the day my first military occupation was Avionics Technician (AT) in the Navy.  I was assigned to the Airborne Early Warning community working on E-2B aircraft.  A fun and sometimes challenging aircraft to work on, it had some pretty slick electronics in an electron tube kind of way.  Among the many things we were responsible for was entering the crypto codes in the various radios.  This was done with a "key" about four inches wide by an inch and a half thick and maybe a foot long.  While probably long ago declassified, I'll play it safe with the descriptions other than to say the process was to take the daily code info in paper form and enter it in the key every morning.  The key was then used to transfer the code to the aircraft radios before the first flight of the day.  In theory the codes could be kept in the aircraft all day, but frequently an aircraft would need to be rekeyed in between flights.  Being communications codes they were designed to be easily erased (zeroed, to use the technical term) and frequent did so on their own.

A Grumman E-2B Hawkeye of carrier airborne early-warning squadron VAW-113 Black Eagles, Carrier Air Wing Fourteen (CVW-14), after landing on the aircraft carrier USS Coral Sea (CV-43) in 1979. The E-2B BuNo. 150534 was one of 49 E-2A upgraded to the E-2B-standard. It was transferred to VAW-115, CVW-5, on the USS Midway (CV-41) as "NF-602" in Dec 1979. (Public Domain photograph via Wikipedia)

Since we were responsible for said gear, all AT's in the squadron had Secret clearances and we had an appropriate safe in the shop where the keys were kept.  The code information was kept by the security officer, a pilot who was assigned the position as a collateral duty.  He was responsible for making sure all the keys were coded in advance of the first launch of the day.  Some coded the keys themselves, others would deliver the codes and the AT shop would take care of it.  This system worked well until one of our young security officers decided that since our normal zero dark thirty launches caused him to miss too much of his beauty sleep, the AT shop had an approved security container and the necessary clearances and skills... Why not drop off the monthly code listing and have the AT's take care of it since they were already up?

Exhibit in the National Cryptologic Museum, Fort Meade, Maryland, USA. All items in this museum are unclassified; items created by the United States Government are not subject to copyright restrictions.

This probably seemed like a pretty good idea at the time, but in describing his plan to us he was just a little too gleeful about being able to sleep in.  Being a Naval Officer, we didn't feel it was appropriate to disagree with his plan, but were somewhat put out by it.  But what are you going to do?  We went ahead and entered the codes and then put each days code sheet back in the safe.  We knew that accountability of classified material was no joke, and each of those sheets would need to be turned in to the appropriate place at the end of the month.

Come the end of the month our security officer strolled in one afternoon (we hadn't seen him before noon since he offloaded his early morning duties on us) and requested the old code sheets.  Where upon yours truly gave him the innocent look only an E-4 can pull off and said, "What code sheets, sir?"  Did I mention that he did not have the combination to our security container?  Pity, that. After it became clear that I was going to continue to be professionally ignorant, he retreated and tried later with our shop supervisor.  It turns out our shop boss had the same opinion of apparently lazy junior officers that we did, and provided no further assistance.  We kept this up for a couple of days, just to get his stress level up.  That peaked about the time we asked, "Weren't those sheets supposed to be destroyed after use?"  That caused him to develop a rather greenish tint.  Our division officer was amused by the whole thing.  He couldn't keep a straight face when he told us the the security officer went to our Commander to complain, only to be told, "It looks like the AT's have you over a barrel, doesn't it?"

After a few days of this our division officer suggested that it was time to return the codes before it became an official problem at the crypto shop, so we promptly called our security officer and let him know we "found" the sheets in question if he would care to pick them up.  It seems he wasn't doing anything at the moment and came immediately.

The next morning he delivered the appropriate code sheet the usual two hours before the first launch, and emphasized that if we had any problems to contact him day or night, and he would be there promptly.

In the Navy, it is normally the job of the Chief Petty Officers (E-7 to E-9) to train junior officers, but every now and the it becomes a shop project.

Monday, February 09, 2015

Retirement Flight

UH-60 of C/1-159 Det 1 (Dust Off)
In addition to the Attack and Assault Helicopter Battalions in the state, we have a Med Det assigned to our facility as well.  This weekend one of their pilots took his last flight prior to retiring.  Here he is taxiing in after the flight.  The fire department provided the water salute, a nice touch.

Monday, January 26, 2015

Weekend in the Field

One of our UH-60's arriving to our field LZ
Being an aviation unit, our weekend drills are normally conducted from our home station.  This makes sense since we can access any kind of terrain we need for training purposes easily, and why waste time moving to a different location?  One of the exceptions to this rule is when we're doing gunnery training.  This weekend we relocated to the Florence Military Reservation in Arizona where our small arms ranges are located.  We did our annual marksmanship qualifications, some training in Army field tasks, and the ground fire stages of our aerial gunnery qualifications.  This allows us to get the new crew chiefs up to speed on the M-240H machine guns without the noise and movement normal to flight.  In March we'll be doing our actual aerial gunnery training and qualification, which will be another field drill.  Gunnery is probably the most fun of the tasks we get to do.

Wednesday, December 10, 2014

State Muster

An extreme case of parking in multiple spots.  Setting up our display in the morning.
This weekend Arizona had a state wide National Guard Muster at the Sun Devil Stadium on Arizona State University's campus.  Never missing the opportunity for a dog and pony show, we flew a helicopter in for a static display along with representative samples of other military equipment.  I spent the day with our crew showing off the Blackhawk to anyone interested.  I actually enjoy doing static displays once in a while as people who have never seen a helicopter up close get a chance to take a look and ask questions.

Thursday, November 20, 2014

Fly By

Marine AH-1 Cobras
This morning I heard the characteristic Huey thumping sound outside, and of course had to investigate.  It was a couple of Marine AH-1 Cobras, probably from MCAS Yuma.  When Bell made the Cobra, they used a lot of the UH-1 design to work from.  It could be said they took a Huey and shaved the fuselage down to 36" wide and started putting armament on it.  That would be a simplification, but isn't too far off the mark.  The Army retired the Cobra and Huey many years ago for the Apache and Blackhawk, but the Marines have stuck with it, with Bell still updated the designs.  I've always had a soft spot for the Cobra.

(Note:  It just struck me how much technology has changed since the Cobra was introduced.  I heard these birds, grabbed my camera and photographed them, downloaded, selected and post processed the image and posted it on the blog.  As I write this, they're probably still airborne.)

Monday, September 29, 2014

Tucson

A rotor wing reunion
The state finally deciding that we had enough money, we had our final drill of the fiscal year this weekend.  This one was unusual for me as I ended up in Tucson nearly the entire weekend.  We were supposed to ferry the Land Component Commander ( a General) around to the range facility in Florance and then to Tuscon, with a return planned in early afternoon.  Unfortunately the weather in Phoenix decided to have another record breaking day, with weather so bad they not only closed Sky Harbor airport, they evacuated the control tower.  Usually the big storms pass through relatively quickly, but this one had staying power which resulted in our VIP passengers electing to take ground transportation rather than wait it out.  (The general pointed to a United 737 waiting on the ramp next to our bird and said words to the effect that they would probably get through.  We pointed out that particular aircraft was diverted from Phoenix.  The passengers sat out there for about three hours before things finally opened up.) Because of duty day limits command decided we should overnight at Tuscon and return the next day.

While there a company of AH-64 Apaches and a couple of CH-47 Chinooks stopped for fuel and lunch.  We had quite the line up there at the airport for a while.

Thursday, September 04, 2014

Caught One!

F-35 turning crosswind for Luke AFB
I finally managed to catch one of the new F-35's out of Luke AFB today.  According to the PAO they're now up to 7 aircraft and have just recently passed 100 sorties.  They are a bit louder - they really do remind me of the old J-57 engines, but I don't find them to be any better or worse than the F-16.  Of course I grew up around tactical aviation so some of the neighbors may disagree.  Lately they've been taking off and landing to the south which is a bit unusual for Luke.  I usually get the best look at them as they return from Gila Bend for runway 03L/R. 

Tuesday, August 19, 2014

A Korean Memory

Even the tankers were loaded for bear...
OldAFSarge just posted a story that brought back some memories...  This was back in 1976 when we were both E-4's in our respective services, though we hadn't met.  In one of the periodic flare ups that happen with depressing regularity in Korea, a ruckus occurred on the DMZ that ended up in a lethal fight with axes of all things.  This snapshot was taken during our response from the USS Midway to the incident.  During our month of "practice strikes" on Nightmare range; conveniently located near the DMZ we operated pretty much round the clock dropping ordinance.  I remember taking this shot since the aircraft, an A-6A of VA-115 was assigned as a tanker, and you may notice he's carrying 500lb bombs and sidewinder missiles in addition to the refueling equipment.  He brought the missiles and fuel tanks back, but left the bombs on the target.  You should have seen what the aircraft actually assigned to bomb looked like!  As a historical note at the time CAG-5 aboard the Midway had two squadrons of F-4s (VF-151 and VF-161), two of A-7s (VA-56 and VA-93), and an A-6 squadron (VA-115) handling offense.  In a supporting role were VQ-1s EA-3, VMFP-3's RF-4s, VMAQ-2's EA-6s, VAW-115's E-2s, and HC-1's SH-3s.  Not a bad turn out for one ship.